Mohawk College uses Microsoft Exchange Online Protection (EOP) an email filtering service that helps protect our organization against spam, phishing and malware. Exchange Online Protection includes features to safeguard Mohawk College's network, computers and users from potential threats sent by email.
What is Spam
Email spam, also known as junk email, is unsolicited messages sent in bulk by email. Most email spam messages are commercial in nature. Whether commercial or not, many contain disguised links that appear to be for familiar websites but in fact lead to phishing websites or sites that are hosting malware. Spam email may also include malware as scripts or other executable file attachments (trojans).
What is Phishing
Phishing is an identity-theft scam that uses "spoofed" or fake emails and websites to trick people into giving out personal information, such as credit card numbers, usernames and passwords, or social security numbers. Phishing is usually done by hijacking the brand identity of a bank or an online store in a spoofed email that is sent to large numbers of people. The email will usually contain a link to a web page designed to look just like a legitimate company's site. A phishing scam will use this page to capture any information that you provide, then sell or use the information for malicious purposes.
Quarantine - Did some of my emails get blocked?
Release a blocked message
To release a suspected blocked message visit your Quarantined Email
Searching for a blocked message
Use the ![]() Search box and a corresponding value to find specific messages. Wildcards aren't supported. You can search by the following values:
Search box and a corresponding value to find specific messages. Wildcards aren't supported. You can search by the following values:
- Sender email address
- Subject. Use the entire subject of the message. The search isn't case-sensitive.
After you've entered the search criteria, press the enter ENTER key to filter the results.
Release an email to your inbox
This action isn't available for email messages that have already been released (the Release status value is Released).
If you don't release or remove a message, it's automatically deleted from quarantine after the date shown in the Expires column.
After you select the message, use either of the following methods to release it (deliver it to your mailbox):
- On the Email tab: Select
 Release.
 - In the details flyout of the selected message: Select Release email.
In the Release message to your Inbox flyout that opens, select Report message as having no threats as appropriate, and then select Release message.
When you're finished on the Release message to your Inbox flyout, select Release message.
In the Messages released to your Inbox flyout that opens, select Done.
Back on the Email tab, the Release status value of the message is Released.
The message is delivered to your Inbox (or some other folder, depending on any Inbox rules in your mailbox).
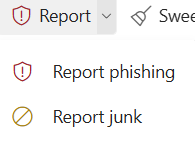
Report Spam or Phishing
Report your Spam\Phishing to IT and Microsoft EOP for better filtering
Please submit your spam and phishing emails to Microsoft to help improve SPAM and Phishing filtering. Using the built-in reporting tools sends copies of the suspicious emails to Mohawk IT as well as Microsoft.
Office 365\Webmail:
- Select email and click on the Report button on the Home tab and select Report phishing or Report junk.
Outlook 2016/2019 (Windows):
- Right-Click on the SPAM email and select Junk -> Report as Junk or Report as Phishing
